The tufted headboard tutorial is finally done. It was way harder than I thought it would be, which is why I am late on getting the post up. I think it was harder to make this tutorial than it was to make the tufted headboard! I can not say that my instructions are perfect, which is why I am going to give you links at the bottom of this post of excellent DIY instructions on how to make a tufted headboard.
My headboard is not the norm by the way. I have decided to call it the Pin & Tuck style tufting. The way I do tufting is no way near as precise and time consuming as the standard Diamond Tufting that is done. Don’t get me wrong, I love me a good diamond tufting, with the deep tufts all laid out in a beautiful diamond pattern, you can’t get any classier than that. But I am way too impatient and too much of a perfectionist to do that method. So I came up with my own style, kind of a free style. Maybe some day I will take the time and really do a real diamond tufted headboard, but for now, this method works for me.
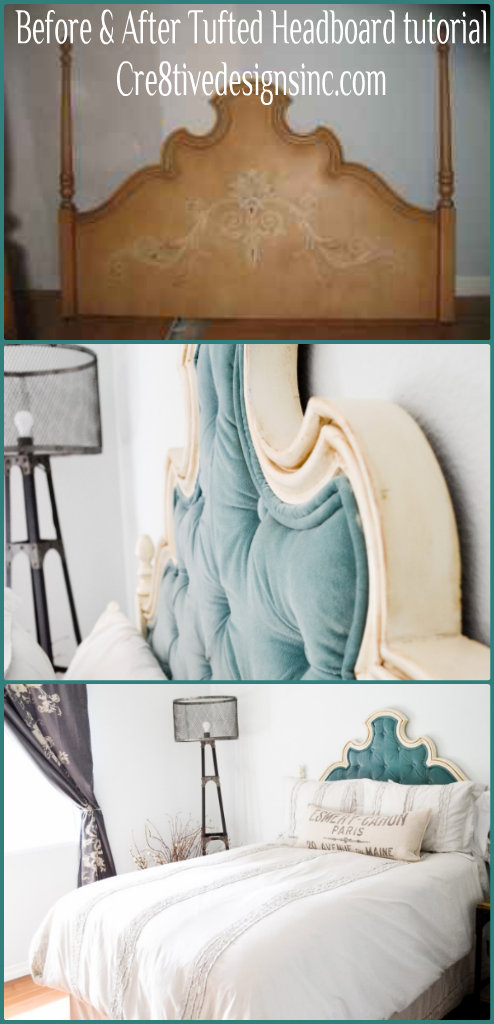
Just to keep everyone up to speed in case you missed my last post, this is the before
 And this is the after

{the damask drapes are from Anthropologie and they still have them in stock}
I condensed the steps into pictures. If you click on the picture you can read it much more clearly. If I didn’t do it this way, this post would of been a mile long!

Oops, I forgot to mention that I cut off the long bed posts and attached the finial with Gorilla glue to the shorter post.


I know this all might look intimidating, but honestly it isn’t that hard to do. I gave you as many details as I could, so don’t get discouraged by the long tutorial. With my method of cheating the tufts, and gluing the upholstered buttons, it saves a lot of time and you still get the tufted look. I didn’t include the paint finish technique I used in the tutorial since it was mainly to show you how to upholster. These are the 3 steps I used, paint, distress, and glaze. As always, if you have any questions feel free to contact me at cre8tivedesignsinc@gmail.com or leave a comment below.

Here are some GREAT tutorials on how to make a tufted headboard
This one is the one most similar to the headboard I did
Hooking this headboard up to Creating with the Stars for a chance to to duke it out in a four-week competition to see who’s the most creative. Wish me luck!


This is sooo beautiful. Love the color , the buttons and well just everything. Thank you for sharing this fabulous tute.
Mandy
Thanks Mandy! I read that tutorial so many times to see if it made since my eyes were going cross eyed.
I’m so glad you posted a tutorial! This came out so beautifully! I’m definitely in love!
Thanks Ashley, it was a bear to get the tutorial done, but hopefully it will “guide” people through the process
I love this headboard. You did a great job with the tute. (I have to admit I didn’t read it word for word as I don’t plan to do this anytime soon)
I like your cheat system. 🙂 Seems like something I prefer to do. I am pinning this puppy!
gail
Great tutorial, Stephanie. Now to find an awesome shaped headboard… 🙂
Thank you so much for linking up. Featuring this tomorrow at my party when it starts in the afternoon!
Thanks for the tutorial Stephanie! It does look hard but I love how you described it step-by-step. I still can’t get over how beautiful it is, I’ve shown my husband several times and he’s really impressed too. 🙂
Halfway through reading the post, I jumped onto Kijiji to see if there were any good headboards for sale but no luck so far. Will have to keep looking though!
Keep looking Jadyn, one will come up I just know it! How sweet is it of you to show your hubby, thank you!
That looks absolutely gorgeous! What a wonderful tutorial! Megan
Oh my goodness, how gorgeous is this? I’m simply swooning! What a fab tutorial (I love the ‘pin and tuck’)and thanks for the shout out too, so glad you could use the double welt cord how to! I adore that fabric BTW, bravo!
xoKate
Oh thanks Kate! Honestly, I could of squeezed you just like you wanted to do with the lady who gave you the tip in the fabric store. It really was so darn easy to do. No special foot required, which was the best part.
Wow, wow, wow. This is just stunning. Looks like it took a lot of work, but totally worth it. It looks like it costs a fortune! Great job!
It looks just scrumptious! I don’t know why double welt cord intimidates me, but it does. I did a diamond-tufted headboard myself recently and posted a tutorial. I have to agree that taking the step-by-step photos and writing the step-by-step instruction is the hardest part of the job! Here’s my headboard.
http://www.imbusyprocrastinating.com/2012/02/how-to-upholster-diamond-tufted.html
It’s very simple but I love how deep the tufts are. I’ve been wanting to do a headboard in a similar to yours, so I’ll have to keep my eyes peeled for one to work on!
I love your drapes! Can you share the details please? If bought, where, and if made, how?
I am also bookmarking your tutorial for the tufting. GREAT idea with the no-holes. I am planning on tackling my headboard in a couple of months.
Thanks!Stacey
Thank you Stacey! The drapes came from Anthropologie. They are called Viceroy Velvet Curtains and they still available.
LOVE your headboard – my jaw dropped when I saw it at Centsational Girl. Thanks for the shout-out too!
This is great! Thanks for the tutorial!
Fantastic! Quite an undertaking, but worth it!
No wonder you were features!! DANG! That is gorgeous and looks very intimidating. I would be scared to take that on. Wish you lived nearby. haha. Amazing. Turned out so great. And, looks awesome in the room. I’m in the market for a new headboard for the maser. This looks tempting, though I think I’d screw it up and want to kill myself out of frustration… I’d pay someone to do it. haha. Great job!! I’m so impressed.
Hi! I just signed up as a follower of your blog (and on Pinterest as well). This is so lovely – I will be doing a headboard soon as well (not tufted) but it will be intricate and since I’m a decorative artist and designer and not an upholsterer…it will be a miracle if I finish it and actually blog about it. Your instructions are great – so “to the letter.” I can see you are really not only a great designer…but so meticulous as well. Great project. Thanks for posting!!!!
Try to pop over to my blog as well, OK?
Linda
Great job Stephanie! I was wondering if you would mind telling me what type of fabric you used? If you can remember. 🙂 I am looking for a very similar color and was hoping for a velvet type fabric. Awesome tutorial, can’t wait to get started on my headboard!
Hi Ange, yes I remember {thanks to blogging I was able to go back and look it up otherwise I probably wouldn’t of remembered lol} it was Thom Flicia turquoise velvet fabric from Calico Corners. I am sure your headboard will be beautiful! Stephanie http://cre8tivedesignsinc.com/
Hi, I was wondering how you got the wood to look the way it did after? What steps did you take?
Hi Nicole, I used heirloom white spray paint on the frame. I added glaze {you can get the 6 oz bottle at Michaels} to a medium brown acrylic paint and wiped it on, and let it set for a couple of minutes, and then wiped most of it off, keeping more glaze in the grooves for depth. I hope that helps!
I love your tutorial! I am on the hunt for a headboard to makeover but it is taking a while to find the perfect one! I keep thinking I need to find an upholstered one to redo but This one you used was just wood before you started right? How thick was the foam you used?
Also, where is your comforter from!
Hi Jamie, the headboard I used was just wood to start with. The depth of the carvings is what you need to look for. The outer scroll work was deep enough that I was able to put foam and fabric {I think it was maybe an inch and a half?} on the inset part and tuft it. If you got a headboard that was already upholstered, you would have the hassle of taking off the old to put on the new. If you buy just a wood headboard with nice deep carvings that has an area that you could add fabric that would be ideal. Hope that helps. The duvet is by Cynthia Crowley.
Hi Stephanie, I came across the site of your inspiration photo! Thought I would pass it along – it is by Ghislaine Vinas Interior Design and the site I found it on is: http://www.cococozy.com/2010/02/see-this-house-having-fun-with-bright.html?m=1
I am on a hunt of my own for help upholstering a tufted bed of a similar shape & Rococo style headboard as yours, and came across both your site and that one you mentioned wanting to give credit where credit is due! 🙂
Thanks for the helpful tips!!
OH thank you Holly. I have now edited the post to reflect the link. I love Cococozy’s site, I should of known I saw the inspiration picture there! Thanks again!
You bet! Funny when searching the web and things start to overlap and interconnect — I just happened to notice and put two and two together. 🙂
Tomorrow is big project day – I found a nice headboard and footboard (and matching mirror) on Craig’s List that I’m painting and starting to upholster tomorrow! (God help me LOL) Intimidating a bit, but your tutorial and others make me crazy enough to believe I can actually do this. I’ll post my project and link back when I finish so you can see it. Thanks again for the detailed tutorial 🙂
Holly
Help.. I love this headboard and the fabric is perfect. Can you give me the style name for the fabric. Thanks so much
Hello, the name of the fabric is Thom Flicia turquoise velvet fabric from Calico Corners. I don’t know if they carry it any longer, but you could also google it and see if there is another retailer that carries it.
This looks awesome! I am about to start my own headboard and it seems like there are three main ways to do tufting. Yours by far looks the easiest! And I like the way your outcome looks better than some of the more complicated ways. Just to be sure I understand correctly, you literally just stapled the fabric and foam down to the headboard in a diamond pattern. Right?
yep, that is all I did for the tufting. Just stapled the fabric and foam to the board for the tuft, and then glued the fabric covered button into the hole. It is not like you are going to be sitting on the fabric, so it holds up just fine.