I finally put the tutorial together on how to make the tailored valance I did here. My “assistant” Brady came over one day and took pictures and video of the process. He hasn’t finished the video, but I will post that when he gets it done. I didn’t take pictures when I actually made my valances, so I had to do a mock up version for this tutorial.
With this type of valance you can get away with not lining your fabric. The majority of the valance is against the upper part of the wall above the window, very little is in the actual window. Whenever you can see a valance or drapery from the outside looking in, always line the fabric to give your windows uniformity from the outside view. Also, make sure the type of fabric you are using is not a thin cotton, otherwise you might have to line it to give it more visual weight and to lay properly.
Here are the supplies you will need:
- 1″ x 4″ pine board {make sure it is straight} the length of your window plus 4″
- White fabric to cover the board
- Fabric for your valance {quantity depends on the size of your window}
- Sewing machine {this tailored valance can be made into a “no sew version” by using iron on sewing tape rather than the sewing machine}
- Iron
- Staple gun
- “L” brackets

{You might think this next step is unnecessary since the board will be covered in your valance fabric. The reason for this is, if you put this valance say in a window above a couch, and someone is to look up they won’t see raw wood behind the valance. It gives it a more finished look}

 {Clarification as to why you need the extra 7″. This is the total for the two sides of the board which are each 3 1/2″ wide}

 This is where I forgot to take a picture of how I placed the board on the fabric and how I lined it up. Contact me if you have any questions on this step

 You should use at least two “L” brackets to hang your valance, three if your window is super long. Once you get your “L” brackets up, slide your valance on to the top of the bracket centering the valance to the window.
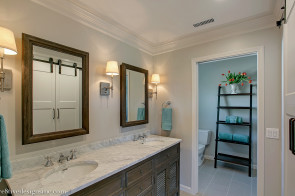
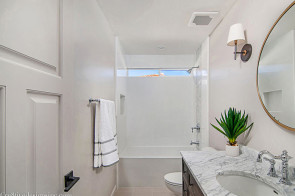
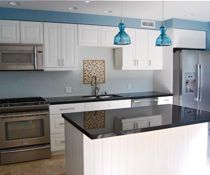
Your finished window should look like this

Doing tutorials are always tough for me, so if you have any questions please feel free to contact me. But I hope I covered it enough that you will be able to make your own. If you do, I would love to see pictures!
Sharing this project with these lovely ladies
Erin’s Just a party with my peeps
Judy’s Swing into Spring


I don’t plan to make any, but I know how to make them now! Great tutorial stephanie!! I can’t wait to see the video. 🙂
gail
That looks beautiful! I love it! Maybe I’ll make some for our guest bedroom…
This is outstanding Stephanie! Your tutorial was very helpful. Me thinks I will be making some very soon : )
Stephanie, I LOVE THIS!!! I’m getting ready to redo my Great Room and this will definitely come in handy 🙂
Oh, and I pinned this too!!
Omg where did you get the fabric it is so perfect for my living room!
Thanks for the tutorial. Love your fabric choice to0! If I have a window that butts up to a wall, how do I determine the width of the board and fabric? I think I need to subtract 2″ for board width, but what about for the fabric? thanks for your help!
I love this! I just made one for the window over my sink. I can’t hang it up yet though because I’m in the middle of painting, but I’m making two more for the other windows in my kitchen too!
Casie, that is so exciting! I hope you share pictures when you are all done. Your on a valance roll! Can’t wait to see them all finished! Stephanie http://cre8tivedesignsinc.com/
I used your instructions to make a beautiful valance for a set of windows >10 feet long. It looks amazing!! Thanks for your help. 🙂
Oh I would love to see pictures Tracey!
great detailed instructions. i have the vision to make mine.
Do you know if these would work on a vaulted ceiling? Our ceiling is vaulted so it’s not a 90 degree angle about the window…does that make sense? Would it still work, or would it probably look weird because of the gap?
Stephanie, I’m really new to Pinterest but if tutorials are tough for you, you certainly make them easy for me!
Oh thank you! It is a daunting task, but hopefully it’s helpful!
I followed your fantastic tutorial and now I have a beautiful valence in my kitchen! Thank you so much! After I hung it I realized it was a bit too long so we took it down, I unstapled the fabric and re – hemmed it about 3 inches shorter. Then the bottom looked kind of unfinished so I sewed on some trim from Hobby Lobby. It is up again and looks great! Thank you!
This is such a great tutorial!!! I’m going to usenet to make a valence for my baby’s nursery! Love it!!!!
Oh how wonderful! It really is an easy project and dresses up a window so nicely. Thank you for appreciating my tutorial, they are hard work, but when someone takes the time to leave a comment, it makes it all worth it 🙂
I don’t understand when measuring to have your board cut why you need to add four inches, two on each side. Your finished valances look like they end and return right at the end of the window frame.
Thank you for the tutorial! Question about measurements. You said to add 7″ to width, 3 1/2″ to length. If I use a 1×4″ board wouldn’t I need to add 8″ width (4″x2) and 4″ length? Also, your video says you fold and iron 1/2″ then fold, iron and sew another 1/2″. Written tutorial says to fold and iron 1/2″ then fold… 1″. Will both work?
I have a 9 ft window that I’d like to create this tailored valance for. The max board width (1x 4) appears to be 8ft at my local store – any suggestions?
I have this situation as well. Did you come up with a solution? I thought about connecting two smaller ones together.
Stephanie, your tutorial is perfect. I am going to my friends house and think I can do this in a few hours. thank you!!
Stephanie,
Thanks for this easy to follow tutorial! At the bottom corner of your valance the material is lined up perfectly with the window, in a crisp, right angle. How did you get the fabric to hang flush to the window?
The ironing of the fold on the fabric helps a lot with the right angle. Also putting a staple on the outside top return helps too. If for some reason your fabric just wont cooperate, I sometimes use a straight pin on the inside fold through the fabric into the drywall to make it stay.
Did you ever post the video? I am so much more a visual learner and watching a video totally helps. Thanks!! 🙂
I was wondering if you have the video of this? I’m building a house and would like to make these for my bedrooms. Watching a video helps me understand what I need to do. Thanks a bunch! 🙂
Im trying to do a mock roman but it has a 5″ side return. They mock roman is 16″ in long and 63″ wide, so I’m also trying to keep the folds sharp by using a rod or board inside the fold. Any suggestions? Thx, You did a fabulous video!
I cannot wait to use this tutorial in my home office! Thank you for sharing!
I have used your tutorial on all the windows of my new home. Thank you doesn’t see adequate. We ran our crown molding up to the valance and each one looks amazing. Thank you again!
That is awesome! Tutorials are hard to do, it just melts my heart to hear this. I would love to see pictures!
I have everything to make these, however at the end of the tutorial the pictures are covering the directions (at least on my monitor). If this gets corrected, would you please let me know? Otherwise I will wing it and hope for the best. Thanks!
Sorry to hear that. It loads just fine on my browser.
I have made these in the past. This was a great refresher as I’m updating! I got lucky because the fabric I chose was creased in a perfect spot – so no hemming!!! It was just doubled which helped for those moments when the sun shines thru. LOVE the idea of “no-sew tape”.
Love it!!
Tried saving this image to show to my grandmother and the only option is to “pin it”?!. Gay.
Sorry about that Stacy, but that is the only way I can detour thieves from stealing my content and using it as their own.
Thank you for the turorial!
You are welcome!
What is your suggestion if there is crown moulding above the window? Should I install it just below the moulding? Or should I install just above the window? There is approx 12 inches from the top of the window trim to the bottom of the crown moulding. Thanks for your input!!
I would say putting your valence to the ceiling and covering the crown molding is more of a personal preference. Having 12″ already above your window, is plenty of space to put the valence up to the crown molding. Put it could go over the crown molding as well, it is the end look that you prefer that is the right choice 🙂
How would you measure for corner windows. There is only 2 inches to the corner on both windows.
I would suggest to google how to do a corner window. There are probably great you tube videos that explain it better than I could 🙂 But what I normally do is…I put one board all the way to the corner of the window, and then butt the second board up to that board, and then measure.
I’m at a loss here. You only used the one board? How does the sides hold their shape? Did the video ever get posted?
Hi Amy, yes the video did get posted. Here is the link https://www.youtube.com/watch?v=7u7D8ROP5VY